

How To Install Apache Guacamole On Windows
Equally a organisation administrator, you may detect yourself (today or in the futurity) working in an environs where Windows and Linux coexist.
It is no secret that some big companies adopt (or have to) run some of their production services in Windows boxes and others in Linux servers.
[ Yous might also like: xi Best Tools to Access Remote Linux Desktop ]
If that is your case, you volition welcome this guide with open arms (otherwise go ahead and at to the lowest degree make sure to add it to your bookmarks).
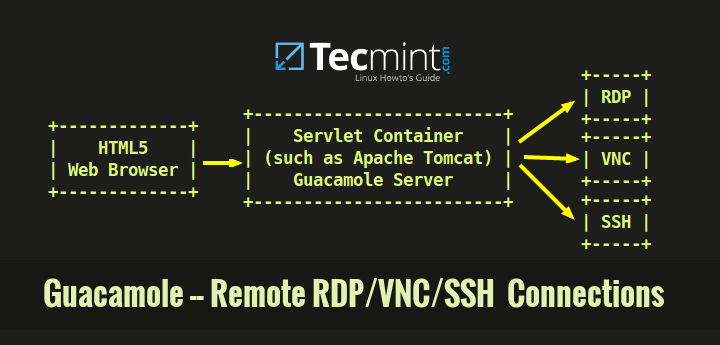
In this commodity, nosotros will introduce you to guacamole, a remote desktop gateway powered by Tomcat that only needs to be installed on a central server.
[ You lot might likewise like: How to Access Remote Linux Desktop Using TightVNC ]
Guacamole volition provide a web-based control panel that will allow yous to switch speedily from one car to another – all within the aforementioned web browser window.
Testing Surroundings
In this article, we accept used the following machines. We will install Guacamole in an Ubuntu box and use it to access a Windows 10 box over Remote Desktop Protocol (RDP) and an RHEL box using SSH network protocol:
Guacamole server: Ubuntu 20.04 - IP 192.168.0.100 Remote SSH box: RHEL eight – IP 192.168.0.18 Remote desktop box: Windows 10 – IP 192.168.0.19
That said, let'south get started.
Installing Guacamole Server in Ubuntu
1. Earlier installing guacamole, yous will demand to take intendance of its dependencies first.
$ sudo apt update $ sudo apt install -y gcc vim scroll wget chiliad++ libcairo2-dev libjpeg-turbo8-dev libpng-dev \ libtool-bin libossp-uuid-dev libavcodec-dev libavutil-dev libswscale-dev build-essential \ libpango1.0-dev libssh2-1-dev libvncserver-dev libtelnet-dev freerdp2-dev libwebsockets-dev \ libssl-dev libvorbis-dev libwebp-dev tomcat9 tomcat9-admin tomcat9-user
2. Download and extract the tarball. As of early on February 2021, the latest version of Guacamole is ane.3.0. You can refer to the Guacamole Downloads folio to discover out the latest version at a given time.
$ wget https://dlcdn.apache.org/guacamole/1.3.0/source/guacamole-server-i.iii.0.tar.gz $ tar zxf guacamole-server-1.iii.0.tar.gz
3. Compile the software.
$ cd guacamole-server-1.three.0/ $ ./configure
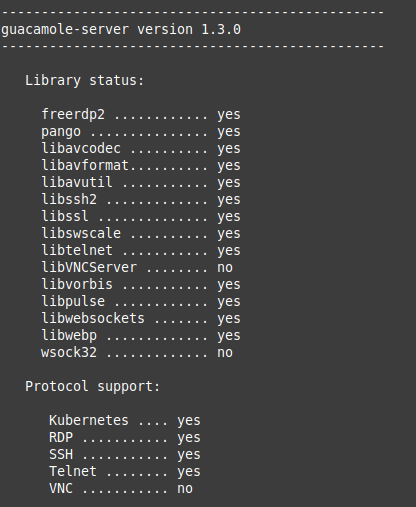
Every bit it is to be expected, configure will bank check your organisation for the presence of the required dependencies and for supported communication protocols (as tin can be seen in the highlighted foursquare, Remote Desktop Protocol (RDP) and SSH are supported past the dependencies installed earlier).
If everything goes as expected you should see this when it completes (otherwise, make certain yous installed all the necessary dependencies):
As the terminal line in the in a higher place image suggests, run brand and make install to compile the program:
$ make $ sudo make install
four. Update the cache of installed libraries.
$ sudo ldconfig
and hit Enter.
Installing Guacamole Customer in Ubuntu
After completing the above steps, the guacamole server will have been installed. The following instructions will at present aid you to set up up guacd (the proxy daemon that integrates Javascript with communication protocols such as RDP or SSH) and guacamole.war (the customer), the component that makes up the final HTML5 application that volition exist presented to you.
Note that both components (guacamole server and customer) demand to be installed on the same car – there is no need to install a then-called client on the machines you want to connect to).
To download the client, follow these steps:
5. Download the web application archive and modify its name to guacamole.war.
Note: Depending on your distribution, the Tomcat libraries directory may be located at /var/lib/tomcat.
$ cd /var/lib/tomcat9/ $ sudo wget https://dlcdn.apache.org/guacamole/i.3.0/binary/guacamole-1.3.0.war $ sudo mv guacamole-one.3.0.war webapps/guacamole.war
half dozen. Create the configuration file (/etc/guacamole/guacamole.properties). This file contains the instructions for Guacamole to connect to guacd:
$ sudo mkdir /etc/guacamole $ sudo mkdir /usr/share/tomcat9/.guacamole $ sudo nano /etc/guacamole/guacamole.properties
Insert the following contents to /etc/guacamole/guacamole.properties. Annotation that we are referencing a file we will create in the next step (/etc/guacamole/user-mapping.xml):
guacd-hostname: localhost guacd-port: 4822 user-mapping: /etc/guacamole/user-mapping.xml auth-provider: net.sourceforge.guacamole.cyberspace.bones.BasicFileAuthenticationProvider basic-user-mapping: /etc/guacamole/user-mapping.xml
And create a symbolic link for Tomcat to be able to read the file:
$ sudo ln -s /etc/guacamole/guacamole.properties /usr/share/tomcat9/.guacamole/
7. Guacamole uses the user-mapping.xml, create this file to define which users are immune to authenticate to the Guacamole web interface (between <authorize> tags) and which connections they can utilize (between <connection> tags):
$ sudo nano /etc/guacamole/user-mapping.xml
The following user mapping grants admission to the Guacamole web interface to a user tecmint with password tecmint01. And so, inside the SSH connection, we need to place a valid username to log in to the RHEL box (you will be prompted to enter the corresponding password when Guacamole initiates the connection).
In the case of the Windows 10 box, in that location is no demand to do that as we volition be presented with the login screen over RDP.
To obtain the md5 hash of the countersign tecmint01, type the following command:
# printf '%southward' "tecmint01" | md5sum
Then insert the output of the command in the countersign field inside the <authorize> tags:
<user-mapping> <authorize username="tecmint" password="8383339b9c90775ac14693d8e620981f" encoding="md5"> <connection name="RHEL viii"> <protocol>ssh</protocol> <param proper name="hostname">192.168.0.xviii</param> <param proper name="port">22</param> <param proper name="username">gacanepa</param> </connectedness> <connection proper noun="Windows ten"> <protocol>rdp</protocol> <param proper name="hostname">192.168.0.19</param> <param name="port">3389</param> </connection> </qualify> </user-mapping>
As information technology is the case with all files that comprise sensitive information, information technology is of import to restrict the permissions and modify the buying of the user-mapping.xml file:
$ sudo chmod 600 /etc/guacamole/user-mapping.xml $ sudo chown tomcat:tomcat /etc/guacamole/user-mapping.xml
First Tomcat and guacd.
$ sudo service tomcat9 starting time $ sudo /usr/local/sbin/guacd &
Launching the Guacamole Spider web Interface
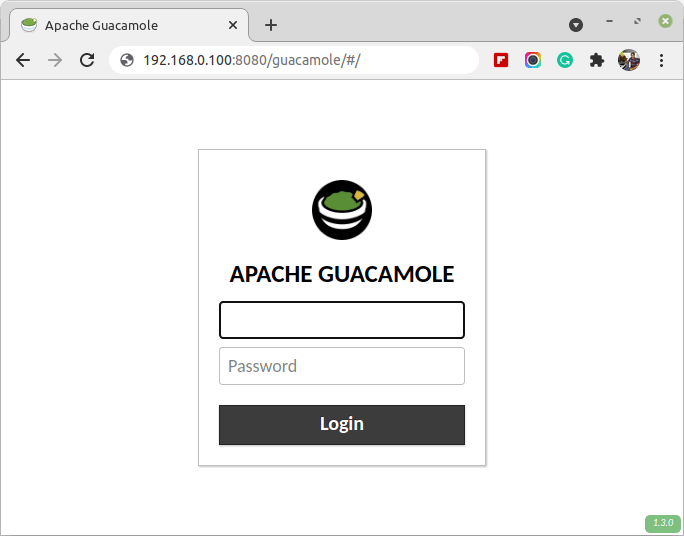
8. To access the Guacamole spider web interface, launch a browser and indicate it to http://server:8080/guacamole where the server is the hostname or IP address of your server (in our case information technology is http://192.168.0.100:8080/guacamole) and log in with the credentials given earlier (username: tecmint, countersign: tecmint01):
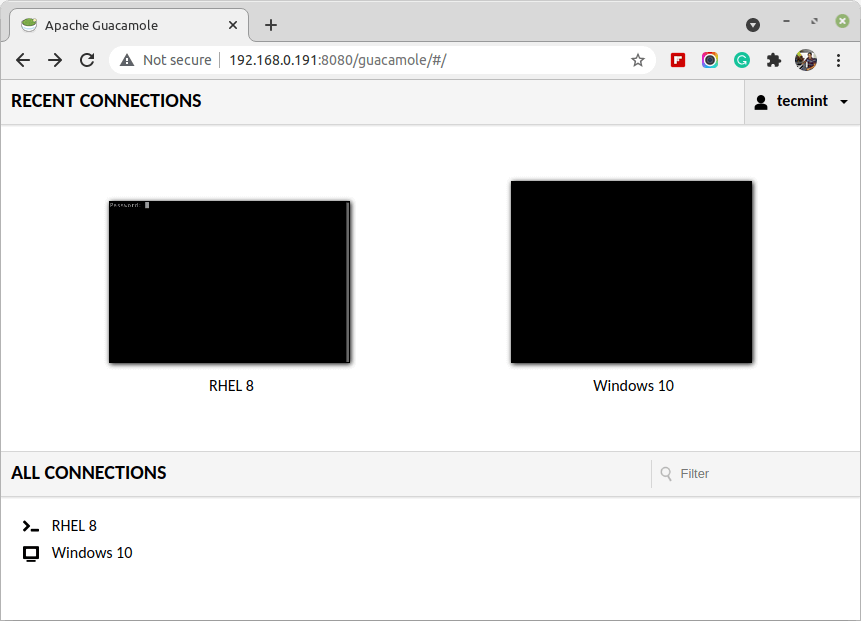
9. After clicking on Login, you volition exist taken to the administrative interface where you volition run across the list of connections user tecmint has access to, every bit per user-mapping.xml:
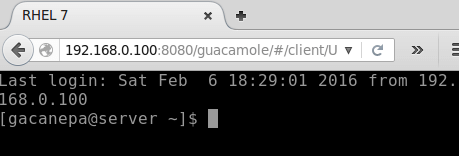
10. Go alee and click on the RHEL viii box to log in as gacanepa (the username specified in the connectedness definition).
Note how the connection source is set to 192.168.0.100 (the IP of the Guacamole server), regardless of the IP address of the machine that you utilize to open the web interface:
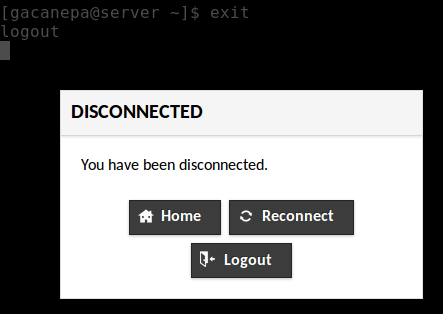
eleven. If you want to close the connectedness, blazon go out and hitting Enter. You will be prompted to return to the main interface (Home), reconnect, or log out from Guacamole:
12. Now it's time to try the remote desktop connexion to Windows 10:
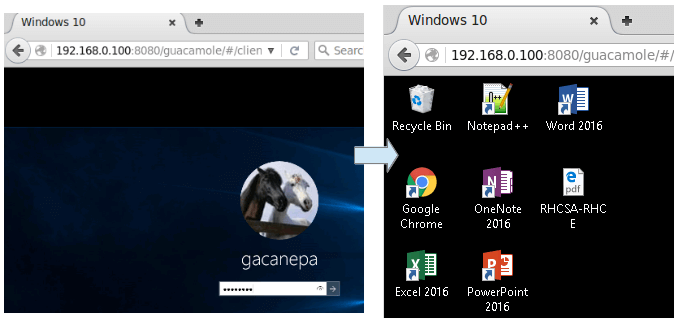
Congratulations! Now you can access a Windows 10 motorcar and an RHEL 8 server from within a web browser.
Summary
In this article, we have explained how to install and configure Guacamole to allow access to remote machines over RDP and SSH. The official website provides extensive documentation to help you set up access using other protocols, such every bit VNC and other authentication mechanisms, such every bit DB-based…
As always, don't hesitate to driblet the states a note if you accept any questions or suggestions nearly this article. We also look forward to hearing your success stories.
If You lot Appreciate What We Do Here On TecMint, You Should Consider:
TecMint is the fastest growing and nearly trusted community site for whatever kind of Linux Articles, Guides and Books on the web. Millions of people visit TecMint! to search or scan the thousands of published articles available FREELY to all.
If you like what you are reading, delight consider buying us a java ( or 2 ) as a token of appreciation.

We are thankful for your never ending support.
Source: https://www.tecmint.com/guacamole-access-remote-linux-windows-machines-via-web-browser/
Posted by: chienwrourner.blogspot.com
0 Response to "How To Install Apache Guacamole On Windows"
Post a Comment